A Beginner’s Guide to Git
I’m training to become a software developer with Turing School of Software and Design, and this is what I know about Git so far. I hope it helps!
Introduction
Git is a version control system. As such, it allows a software developer or (better) a group of developers to keep track of different versions of the software (or other digital project) they are developing. Developers can use Git to take snapshots of the files involved in the project (called “commits”) with associated messages describing the changes made since the last snapshot. This allows them to keep track of changes, roll back to old snapshots if things aren’t working, and have a framework for building a workflow around. This all takes place in a specific directory (i.e., a folder and its sub-folders) where Git is “initialized,” which is called a “local repository” (“repo” for short).
When combined with an online repository service, typically GitHub, developers can “push” (upload) or “pull” (download) their commits from their local repository to a remote repository hosted on a server. This enables a developer to keep working on their project across multiple clients (i.e., a work computer and a home computer), but more importantly it opens up the possibility of multiple developers working simultaneously on a project and enables them to track each other’s changes and negotiate merging the changes they make individually into a shared “master” branch.
Setting up Git
While there are graphic user interfaces (GUIs) available for using Git, it is typically and most efficiently used in the command line interface, namely through Terminal in Mac OSX (the context this tutorial assumes). In order to set up Git in Mac OSX there are several preliminary steps you’ll need to take:
- Install the Xcode Command Line Tools (CLT) by entering the following in Terminal:
xcode-select --install - Install the Homebrew package manager by entering the following in Terminal:
/usr/bin/ruby -e "$(curl -fsSL https://raw.githubusercontent.com/Homebrew/install/master/install)" - Use Homebrew to install Git by entering the following in Terminal:
brew install git
Once those steps are complete, you can enter git --version in Terminal to confirm it is installed. You should see something like the following:
git version 2.23.0
Congratulations! Now you’re ready to start using Git.
Navigating and creating files in Terminal
Using Git requires some working knowledge of how to navigate and create files in Terminal. If you’re already familiar with this, you can skip this section.
Actions taken in Terminal occur within the “working directory” you’re within, unless you specify otherwise. Navigating between folders is therefore critical for getting things done. Here is a brief review of the relevant Terminal commands. The words in italics are placeholders for what you would place there in the command; all commands and file names are case-sensitive.
Navigating in Terminal
Any files or folders can simply be the name of a file or directory inside your working directory (e.g., “photos” or “photos/selfie2578.png”), the relative path to a file or folder farther down the file structure (e.g., “books/novels/fantasy” or “books/novels/fantasy/lotr.epub”) or the “absolute” file path of one elsewhere (e.g., “C:/documents/poems/love_poems/” or “C:/stuff/things/object.blorb”).
-
ls : List the files and directories that exist in your working directory. If you want to see hidden files, add the
-aflag after the command with a space between,ls -a. Flags are options that are “passed” to a command; many commands have them. You can find out what flags/options are available for a specific command with themancommand followed by the command you’d like to learn about, which opens the Terminal “manual page”–e.g.,man ls. -
cd : By itself, followed by nothing else,
cdchanges your working directory to your “home directory,” which is where Terminal opens by default. -
cd directory_path : Change your working directory (cd = change directory) to the directory specified by directory_path.
-
cd .. : Go “up” the file structure, changing the working directory to the one which encloses your current working directory. For example, if the working directory were
C:/users/photos/2019vacation, thencd ..would change the working directory toC:/users/photos. This can be chained together to go “up” multiple times by adding a forward-slash (“/”) and an additional two periods for every additional directory “up” the file structure you’d like to go, like this:../.., which would go 2 directories up.
Creating files in Terminal
Because it is problematic to deal with folder or file names with internal spaces, it is recommended to use underscores (_) or hyphens (-) in place of spaces; and because Terminal (and other programs) are case-sensitive, it also makes life easier if all files and directories are lower-case.
-
mkdir directory_name : Create a directory inside your working directory with the given directory_name. E.g,
mkdir useless_folderwould create the directory “useless_folder” inside your working directory. You could then entercd useless_folderto make that folder your new working directory, if desired. -
touch file_name : Create a file inside your working directory with the given file_name, with our without an extension. E.g.,
touch useless_file.txtwould create the file “uselessfile.txt” in your working directory. With or without an extension, it would be entirely blank; adding an extension simply tells your operating system what kinds of programs should open it by default and what kinds of other rules to apply to it.
Deleting files in Terminal
It could go without saying that one should be careful with these, but one should know in particular that deleting files and folders with rm skips the Recycle Bin, unlike when you delete them in Finder. There is no (easy) way to get them back. So be very cautious.
-
rm file_name : Delete a file in your working directory with the given file_name. For example,
rm useless_file.txtwould delete the file named “useless_file.txt” if it exists in your working directory. -
rm -rf directory_name : Delete a directory and everything it encloses with the given directory_name if it exists in your working directory.
While there are many more commands available in Terminal, these are all you need to set up a local Git repository.
Setting up a local Git repository
This example uses the above Terminal commands to create a directory and files within it to stand in for your codebase. In a real situation, you would set up the local Git repository using the directory that contains your actual codebase or project.
-
Create a directory and files.
-
Open Terminal (perhaps using the Cmd-Space shortcut to open Spotlight Search).
-
Use the
cdandlscommands to navigate to the directory you’d like to create your project directory within. -
Use the
mkdircommand to create a directory (for example,mkdir test_directory) then usecdto make that directory your working directory (e.g.,cd test_directory). -
Use the
touchcommand to create one or more files inside your working directory. For example,touch example_file.txt.
-
-
Initialize Git.
- With the above project directory as your working directory, enter
git init. This “initializes” Git, setting it up in this folder so you can begin making commits and tracking changes.
- With the above project directory as your working directory, enter
-
Add files to staging area and make initial commit.
-
For each file you created in this directoy, enter
git addand then the file’s name. For example,git add example_file.txt. This “tracks” these files, also referred to as adding those files to the “staging area,” an intermediate step before making a commit that ensures you’re only committing the changes you wish to include in a particular commit. This will described in more detail below. -
Use the command
git statusto confirm which files have been added to the staging area and which have not. -
Once all the files have been added, use the command
git commit -m "Initial commit"to make your initial commit with the associated message “Initial commit” (the standard message used for the first commit of a repo). For later commits you can replace “Initial commit” with a specific description of the changes made to the committed files, beginning with a capitalized present-tense verb; e.g.,git commit -m "Add ring object to isengard.txt". -
To check the history of commits made in your local repo, use the command
git log. If the log is longer than your screen size, you might need to enterqto be returned to the Terminal prompt. -
As you make changes to these commited files, you can use the command
git diffto see a rundown of specific differences between those “tracked” files and the versions of them most recently committed. E.g., if you opened “useless_file.txt” in a text editor (such as Atom) and added the line"Here's some useless information"to it, usinggit diffin its working directory after an initial commit might return something like this:
diff --git a/useless_file.txt b/useless_file.txt index e69de29..e63509c 100644 --- a/useless_file.txt +++ b/useless_file.txt @@ -0,0 +1 @@ +"Here's some useless information" -
-
If you want to stop using Git in a given directory, you must delete the hidden
.gitdirectory inside your working directory using therm -rfTerminal command described above, and which is visible using thels -acommand also described above. As mentioned earlier, use therm -rfcommand with extreme caution, because anything it deletes skips the Recycle Bin and is very difficult to restore.
To briefly review, here are the relevant Git commands for setting up a local repository and making commits:
git initgit add file_namewhere “file_name” is the name of a file in your working directory.git commit -m "Add message text"where “Add message text” is the message you associate with the commit.git statusgit log
With these, you can set up a local Git repo and use it to track changes on your local client. What the above steps illustrated was the basic workflow within a local repo, which flows along the lines illustrated in the picture below:

Source: https://git-scm.com/book/en/v2/Git-Basics-Recording-Changes-to-the-Repository
But this is only part of the basic Git workflow, the heart of which is being able to collaborate with other developers by working in conjunction with a remote repository hosted by GitHub.
Overview of GitHub and remote repositories
After setting up a local repo, you can connect it to a remote repo created on Github and “push” (i.e, upload) your local repo to it. You could also “clone” or “fork” an existing remote repo from GitHub to your local machine, which would come already initialized and connected to a remote repo.
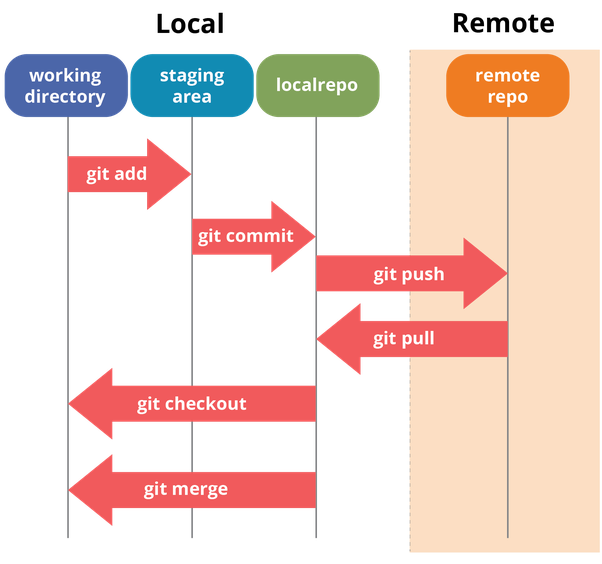
When a local repo is use in conjunction with a remote repo hosted on GitHub, things get a bit more interesting. A contributor to a GitHub remote repo can “push” the current state of the local repo (i.e., everything that has been committed, the “unmodified” column above) to a specified “branch” of a remote repo, thereby merging its changes into that branch, and also “pull” the current state of a given branch of the remote repo down to their local environment.

Source: https://dev.to/mollynem/git-github–workflow-fundamentals-5496
When the local repo is “pushed” to the remote repo, if there haven’t been any other commits made to the remote repo since the local repo was last synchronized with it (either by a “push” or a “pull”) a simple “fast-forward” merge is made and the remote repo moves “forward” to the most recent commit, as in this illustration (where “Master” is the local repo branch and “Origin/Master” is the remote repo branch:
Source: https://www.atlassian.com/git/tutorials/syncing/git-push
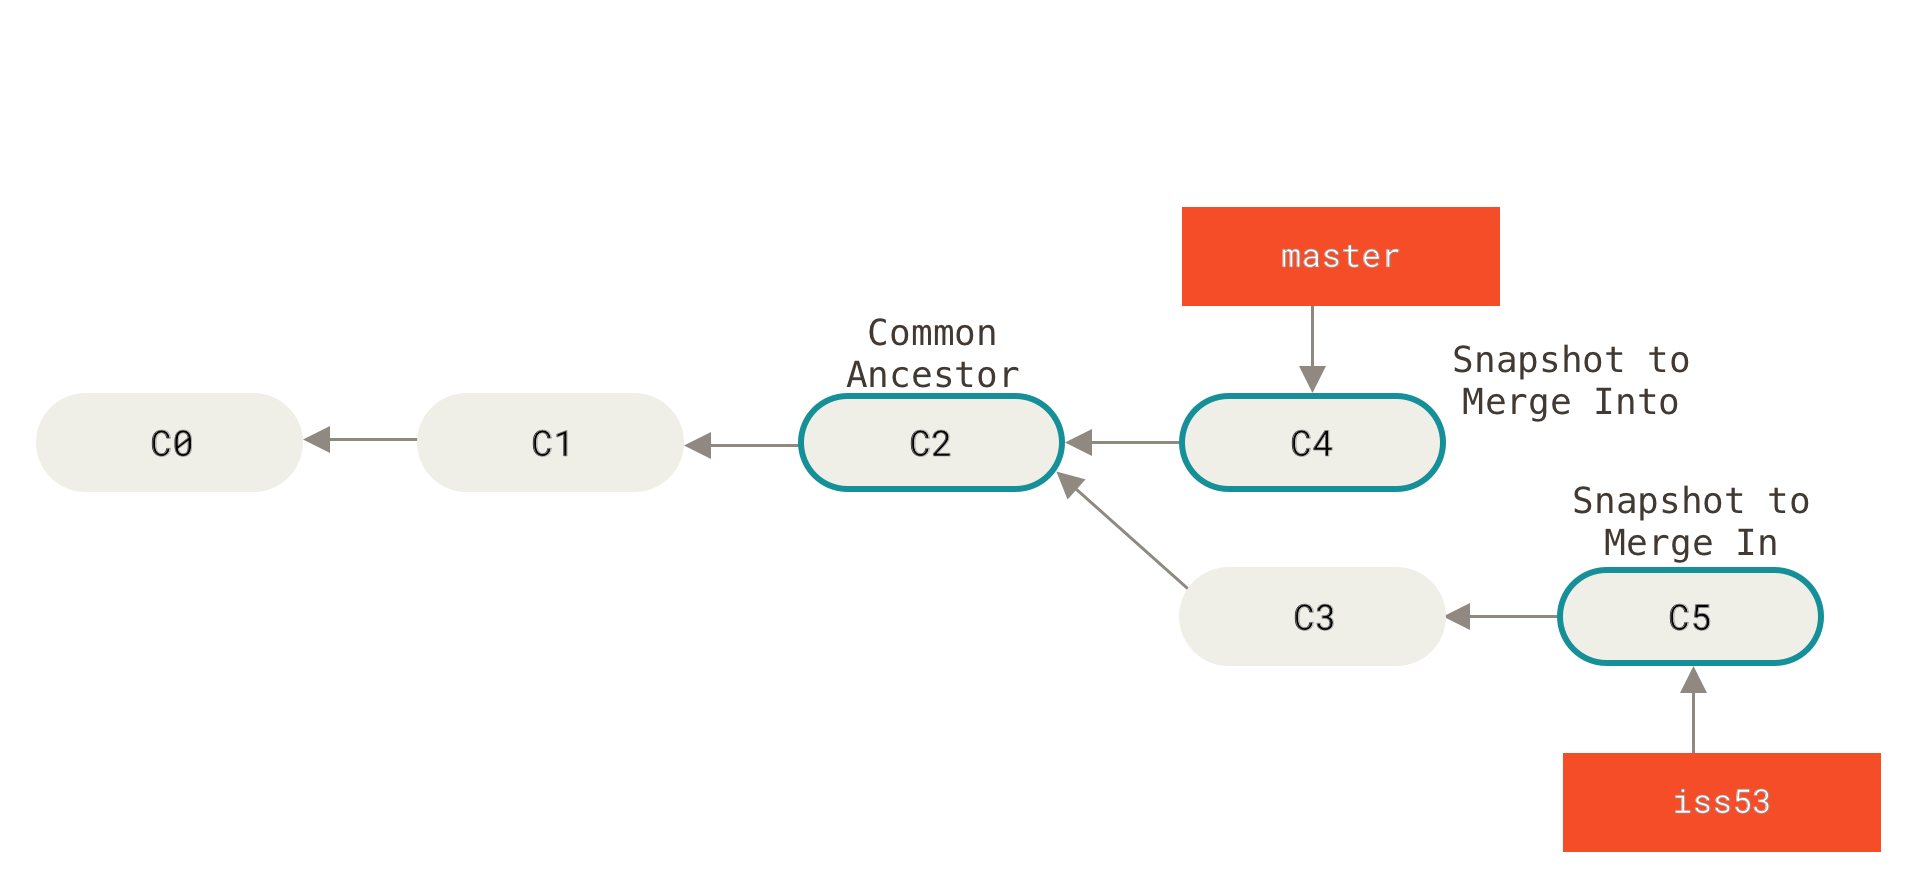
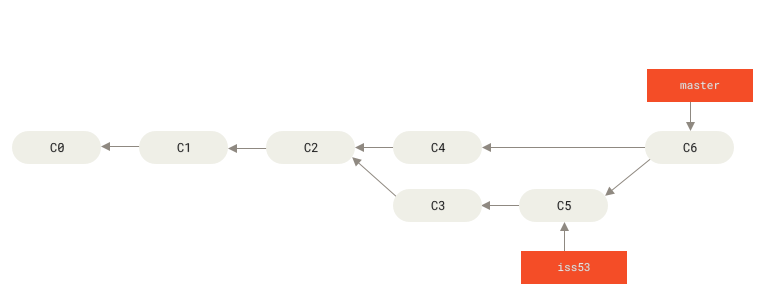
On the other hand, if other commits have been made to the remote repo since the local repo was last pulled from it (or branched; see below), when the local repo is “pushed” it causes a “three-way merge,” as in this illustration where “master” is the remote repo (or master branch) and “iss53” is the local repo (or other branch):


Source: https://git-scm.com/book/en/v2/Git-Branching-Basic-Branching-and-Merging
As you can see, a lot of the power of Git lies in its ability to work with GitHub and allow collaboration between different contributors. The features underlying many of the above illustrations are “branching” and “forking.” Branching creates a separate chain of commits distinct from the “master” branch, allowing a developer to work on one feature in isolation from the main branch so that the main branch isn’t tied up with those changes, before “merging” it back into the master branch.
Source: https://www.atlassian.com/git/tutorials/using-branches
When you “pull” a remote repo in Git, you are pulling a specific branch; and when you “push,” you are pushing commits to a specific branch. You can have multiple branches downloaded to your computer at a time, and you can switch between which branch you are working with in your working directory by “checking out” a given branch.
Connecting a local repo to a remote repo
Now for the specifics. The following is a step-by-step process of how to connect a local Git repository such as the one created by the above steps to a remote repo hosted by GitHub. This won’t deal with the more advanced process of branching, but will introduced you to the commands necessary to interact with that later.
-
Create a Github profile if you don’t already have one, and keep your username and password handy.
-
Optional: set up SSH keys, enabling you to interact with GitHub via Terminal without needing to enter your username and password every time you enter a command that communicates with it.
-
Create a new repository on GitHub, preferably titling your repository with the same name as your working directory.
- Add your remote repository to your local repo’s “remote” list by entering the following command, which can found on the page displayed on GitHub after creating your new remote repository under “…or push an existing repository from the command line”:
git remote add origin git@github.com:your_username/your_remote_repo_name.gitHere’s what the the individual components of this command are doing:
git remote: the base command, which can do a number of things related to your list of remote repos. Entergit remote --helpto view the manual page,qto exit when you’re done.add: signals to Git that you’re adding a remote repo to its list of available ones, unique to your local repo.origin: names the remote repo so it can be referred to by other commands. Origin is the standard convention used to name the primary remote repo you connect to.git@github.com:your_username/your_remote_repo_name.git: the URL of your remote repo.
- Make your initial “push” to your remote repo by entering the following command, similarly available on GitHub after creating your new remote repository under “…or push an existing repository from the command line”:
git push -u origin masterHere’s what the the individual components of this command are doing:
git push: the base command, which do a number of things related to pushing commits to a remote repo. Entergit push --helpto view the manual page,qto exit when you’re done.-u: shorthand for the option--set-upstream, tells Git which branch and repo is “upstream” from your current branch, i.e., the branch and repo you wantgit pullto pull from by default.origin: the name of the remote repo you want to push to, in this case the one we just added to the list in the previous command.master: the name of the branch on that remote repo you want to push your commits into. “Master” is the default name for the primary branch of a repository; i.e., the main version of your project, from which you and other developers will “branch off” from to work on new features and merge back into once those features are working and tested.
Further reading about working with remote repos
Summary
Bringing this together, the full Git workflow goes something like this:
-
Initialize a local Git repo and connect it to a GitHub remote repo, or alternatively clone or fork an existing remote repo from GitHub.
-
Make a branch of the “master” branch to work on a specific feature.
-
Make changes to your files, add them to the staging area with
git add, and commit them withgit commit. -
Push your commits to your branch of the remote repo with
git push. -
Submit a “Pull Request” which tells your other contributors what you’re working on and invites their feedback.
-
Make more changes, add them, commit them, and push them to the remote branch.
-
When your feature is complete, tested, and approved by fellow contributors, merge it with the master branch.